Applicants can access their applications and status pages via:
Slate authentication (default): Using an email address and password
Institutional Single Sign-on: Using credentials created in your institution's single sign-on system
Slate authentication
This is the default authentication method for applicants in Slate. For an applicant to authenticate, they must complete the following:
Go to your institution’s authentication URL:
https://apply.slateuniversity.edu/applyProvide their first name, last name, email address, and, optionally, their birthdate. Slate sends them an Account Creation system email, which includes a 9-digit PIN and a link to your institution’s account creation page. You can customize this email’s content.
When the applicant follows the link in the Account Creation system email, they are prompted to enter the PIN and birthdate (if provided) for verification to create a password. The password is stored as a salted hash.
In the Slate-hosted application, the applicant enters their email address and password.
If the applicant selects Forgot Your Password?, Slate sends a system email that includes instructions to reset their password. This system email is sent automatically and can also be customized.
Institutional Single Sign-On authentication
Applicants can use credentials from your institution’s single sign-on system to access the Slate-hosted application. Slate can authenticate against one single sign-on system for both administrative users and applicants.
🔔 Important!
If your institution requires VPN access for administrative users, this may prevent external login via SSO.
The following procedure links institutional usernames to existing person records. Use the username that your single sign-on system sends to Slate. This value can differ from the person’s email address.
Prepare the SSO usernames and unique IDs for the applicants whose records you want to update.
Create a custom source format to import the usernames. Include these data points in the file:
Unique ID (to match against the appropriate record in Slate)
Username
Map the unique ID appropriately and the username to Record → Slate User Login Override.
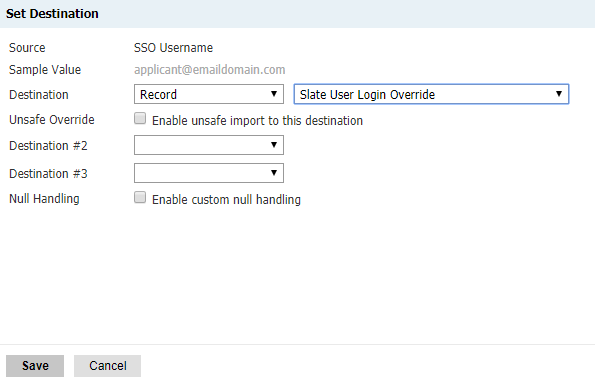
Import the file with the custom source format.
After importing the usernames, give applicants the institutional SSO link. The following example opens institutional authentication and then returns the applicant to the application page. Replace the example hostname with your Slate hostname.
Slate URL:
https://apply.slateuniversity.edu/manageSingle Sign-on URL:
https://apply.slateuniversity.edu/manage/login?realm=&r=/apply/
Providing user access
Applicants who have institutional credentials can use the SSO link. Applicants who use Slate credentials can continue to use the standard login page when your authentication configuration permits both routes. Coordinate the intended login options with your SSO administrator.
Choose the return destination
Keep realm= empty in the person-login link. The r parameter specifies the page to open after authentication. For example, use /apply/ for the application page or /apply/status/ for the status page:
https://apply.slateuniversity.edu/manage/login?realm=&r=/apply/status/Share the institutional login link
Place the SSO link on your institution’s website or in the instructions on the application login page. Label the link so applicants know which credentials to use.
You can also use a friendly URL that redirects to the SSO link. For example, https://apply.slateuniversity.edu/enrolled can redirect to https://apply.slateuniversity.edu/manage/login?realm=&r=/portal/enrolled.
A bookmark to the destination portal skips this friendly URL. The portal settings and database authentication configuration then control the login route. Review Portal Security Scopes & Access Filters before you use a portal as the destination.
Plan access with your SSO administrator
Decide when applicants receive institutional credentials and where you will provide the SSO link. For example, you can offer the link to enrolled students who already have institutional accounts. Using institutional SSO earlier in the application process requires an account-provisioning plan with your SSO administrator.
CAS institutional authentication
If your institution uses Central Authentication Service (CAS) to authenticate people into Slate, the CAS response supplies the username in user. Slate reads profile attributes named firstname, lastname, and email.
When Slate finds an existing person by the SSO username, that login leaves the saved first name, last name, and email unchanged. If record creation through SSO is enabled and the username is new to Slate, Slate first tries to match an existing person using email, first name, and last name together. If no match is found, it attempts to create a person record. See Matching Criteria for Person Records.
The Service CAS Attributes and Service CAS Use ID settings control the identity information that Slate sends to another system. For that direction of authentication, see Slate Authentication Service.
Confirm CAS return URLs for Test and Production environments
The CAS service URL includes the return destination. Its complete value can differ between application and portal logins. Test environments can authenticate independently or use Production authentication, depending on their configuration.
Unsetting SSO usernames
To unset SSO username values:
Query for records that you want to unset the SSO Username for. This query should have a:
Person-scoped unique identifier, like the person record's GUID
Literal export that has a name, like "Clear SSO", but no value/Literal. This is the column you'll use to unset the SSO Username.
Export the results to your desktop.
Import the file with Upload Dataset. The import must:
Be set to Unsafe
Match on existing records
Map the column with empty values from step 1 to Record → Slate User Login Override
Select Null Handling.
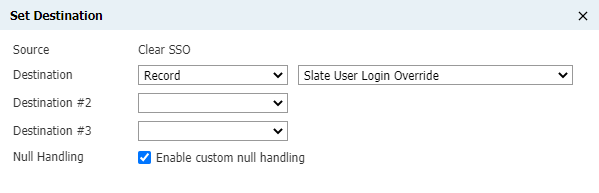
Import the file.
Confirm the import made the desired changes.