🔑 Required permission: Rules Editor
Person Index and Header rules customize the search criteria for Person Records. The index contains the values that users can search by to find a record. The header contains the information that helps users tell similarly named records apart. The two rule types are created and configured separately, so you can make a broad set of values searchable while the header shows only the information your team needs to see.
Index values surface records in the Omni Search, the Lookup tool, and administrative form registration record lookups. Header values appear below the record's name wherever a person record appears in search results.
📖 Further reading
🔎 Looking to customize datasets?
Dataset records work differently: they use a single combined Index/Header rule type, where any value you configure is both searchable and displayed. See Customizing Dataset Record Search Criteria with Index and Header Rules.
Person index and header defaults
Every person record has a default index and a header, even when no rules are in place. Person Index rules add to the default searchable values. Person Header rules replace the default display.
The index: What users can search for records by
By default, users can search for person records by:
Slate Reference ID
Name
Email address
Phone number
A Person Index rule adds search values on top of these defaults, which remain searchable even when a rule doesn't include them.
If users need to find people by other values, such as an external student ID, a legacy system ID, or a Constituent ID, add them to the index with a Person Index rule.
The header: What users see in results
By default, the person header displays:
Slate Reference ID
Birthdate
A Person Header rule replaces this default information: when it applies to a record, its values appear instead of the default Slate Reference ID and Birthdate. To display additional context, such as a city and state, a high school, a graduation year, or a donor giving level, add it to the header with a Person Header rule.
📝 Note
Slate also automatically displays information from the record's rank 1 application (typically, the most recent application), including its round and status, when an application exists. Application header rules control this display, not Person Header rules. See Application Header Rules for details.
Creating the rule
Person index and header values can’t be changed manually. Set them using rules instead.
Person Index rules and Person Header rules are built the same way. The only difference is which rule type you choose when you create the rule: Person Index or Person Header.
📝 Note
Your database might already include a Person Header rule, such as the default Person Header (Global Search Results). Check Database → Rules before creating a new rule. If it exists, edit it rather than starting from scratch.
To create a Person Index or Person Header rule:
Go to Database → Rules.
Select New Rule.
Configure the following settings:
Name: Enter a descriptive name, such as Person Header.
Type: Select Configurable Joins.
Category: Select Records.
Base: Select Person.
Rule Type: Select Person Index or Person Header.
Folder: Select a folder to keep rules organized. Select Other and enter a name to create a new folder, if needed.
Exclusivity Group: Set automatically based on the selected Rule Type. Each rule type has its own Exclusivity Group, so only one rule of that type can apply to a record at a time.
Non-deterministic: Leave it set to Rule is deterministic and has an exclusive priority.
Priority: Enter a whole number, such as
1, if this is your only Person Index or Person Header rule. If you create multiple rules of the same type, see Exclusivity Groups.Status: Select Inactive.

Select Save.
Configuring the rule
In the Action section, build the value this rule applies. For full examples, see Person Index examples and Person Header example.
Set the rule Action to Replace Values from Formula.
(Optional) Add filters if the rule should update only some records. Otherwise, leave the Filters section empty so the rule applies to all person records. If some records need different values, see Multiple headers and indexes.
Add a subquery export and configure the following settings:
Name: Enter a name, such as Index or Header.
Output: Select Concatenate to combine multiple values into one string.
Export Separator: Enter a separator, such as a comma followed by a space (
,). The separator appears only between values that exist, so the value never starts or ends with a stray separator.Exports: Add the values to search by or display. Add Literal exports for fixed text or a new line (
\n).
Select Save.
In Formula, type
@and select the subquery export from the list.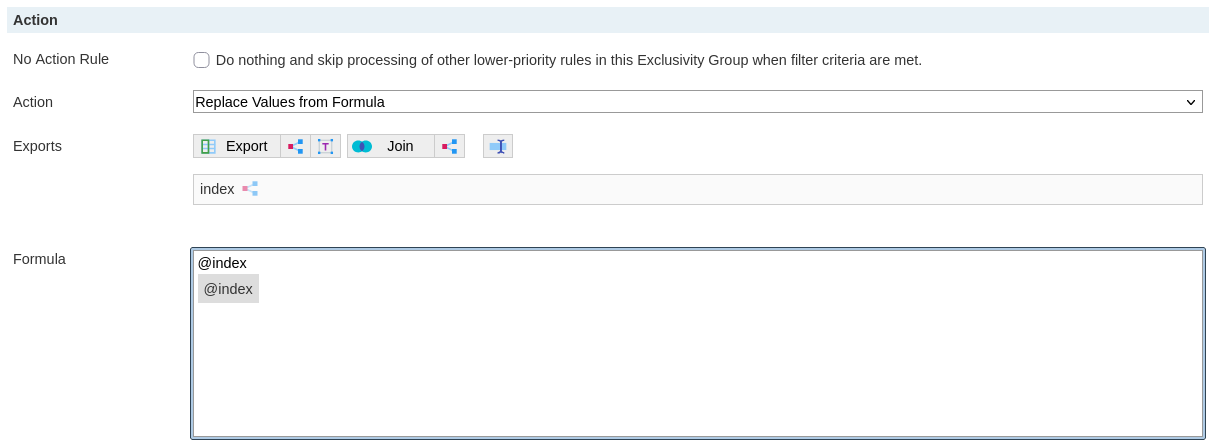
Select Save.
Testing and activating the rule
⭐ Best practice
Index and header rules change how every user searches across the database. Test the rule in your test environment before activating it in production.
🔔 Work in test is lost when re-provisioning
Ask any colleagues who might be using your test environment before re-provisioning. If they’ve been working on something in test that hasn’t been copied to production, that work will be lost.
Test the rule in your test environment before activating it in production:
Move the rule into your test environment. Use Suitcase to copy the rule to test, or re-provision your test environment to use a current database snapshot which includes the rule.
In your test environment, select Edit on the rule, set the Status to Active, and select Save.
Run a Retroactive Refresh on a small set of records to queue them for rule evaluation.
Open one of the records.
Select the Preview pending actions link at the top of the record. It appears when the record has recently been queued for rule evaluation.
On the Preview Actions screen, select Display.
After the preview loads, select Force premature rule execution. This runs the rule on the record immediately, instead of waiting for the next scheduled execution.
Verify the results:
Confirm changes to the header by looking up a record in the Omni Search. The text below the record's name updates with the new information.
Confirm changes to the index by searching for a value only your rule adds, and confirm the record appears in the results. Name, email address, phone number, and Slate Reference ID remain searchable regardless.
When the test results are correct, activate the rule in production:
If you changed the rule while testing, copy it back to production with Suitcase and select Merge Existing so the production rule is updated rather than duplicated.
In your production database, select Edit on the rule, set the Status to Active, and select Save.
Run a Retroactive Refresh so the rule runs on records that already exist. Rules run when a record changes, not when a rule changes, so existing records keep their current values until they're queued.
Multiple headers and indexes
Add filters to your rule if some records should have different index or header values than others. Each variation requires its own rule in the matching Exclusivity Group (Person Index or Person Header). This isn't common, but it may help in a database shared between different campus departments. Review Exclusivity Groups if you're not familiar with their use.
Person Index examples
The three examples in this section are self-contained alternatives for adding search values with a Person Index rule. Use the one that matches what you're adding.
Example 1: Add a single search value
When you need only one additional search value, add it as a direct export:
In the Action section, add an export for the value users will search by, and name it, such as Person Colleague ID. Note the export's name: spaces become dashes when you enter it in the formula box.
In the Formula text box, type
@and select the export from the list (for example,@Person-Colleague-ID).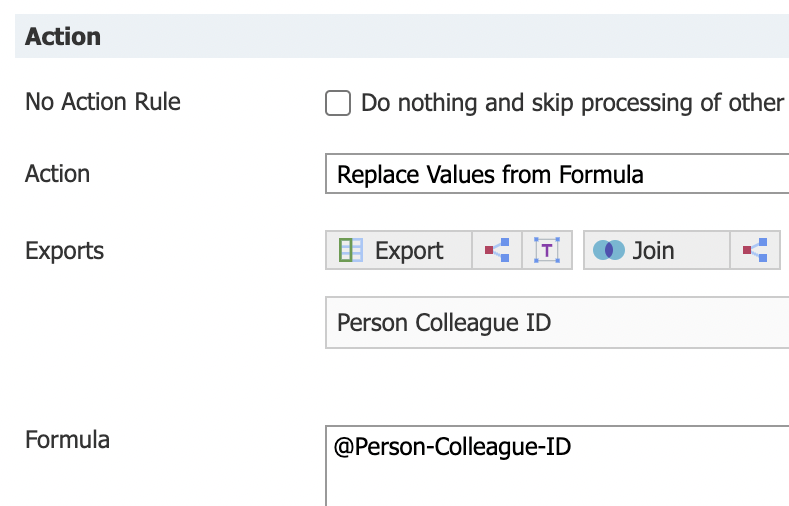
Select Save.
Example 2: Add two or more search values
This approach uses a subquery export, which accounts for records that are missing one or more of the values, so no extra formula logic is needed.
Add a subquery export.
Set the Name to
Index.Select the Output setting Concatenate.
Inside the subquery export, add the exports to combine.
In Export Separator, enter a space, or your preferred separator.
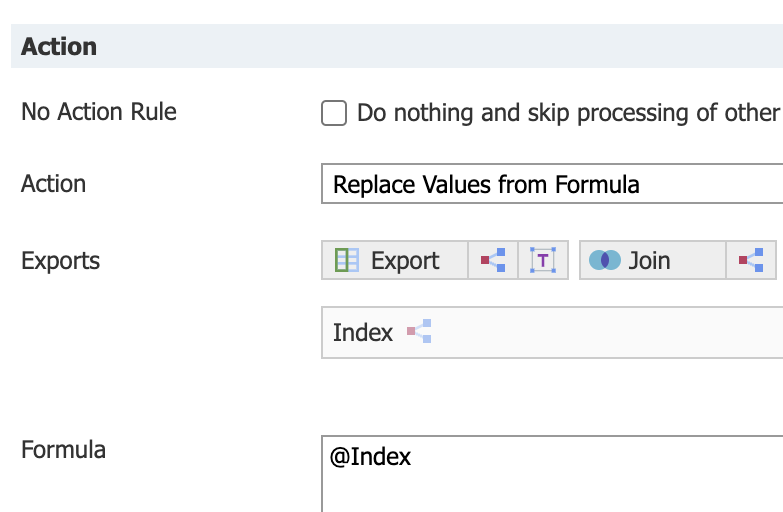
Select Save.
In the Formula text box, type
@and select@Index.Select Save.
Example 3: Add every unique-for-merging value
This approach returns every value a record has in a unique-for-merging field.
Add a subquery export and configure the following settings:
Name: Enter a name, such as Index.
Output: Concatenate.
In the subquery export, create a join from Person to Field Values.
Create an additional join from Field Values to Lookup Field.
Add the Unique for Merging filter from the Lookup Field join and select Value contains a unique ID which identifies a single record for merging.
Add the Store Value filter from the Lookup Field join and select Store Value.
Optionally, add the Type filter from the Lookup Field join and select Real, Integer, and Text/Unspecified.
Add the Values export from the Field Values join.
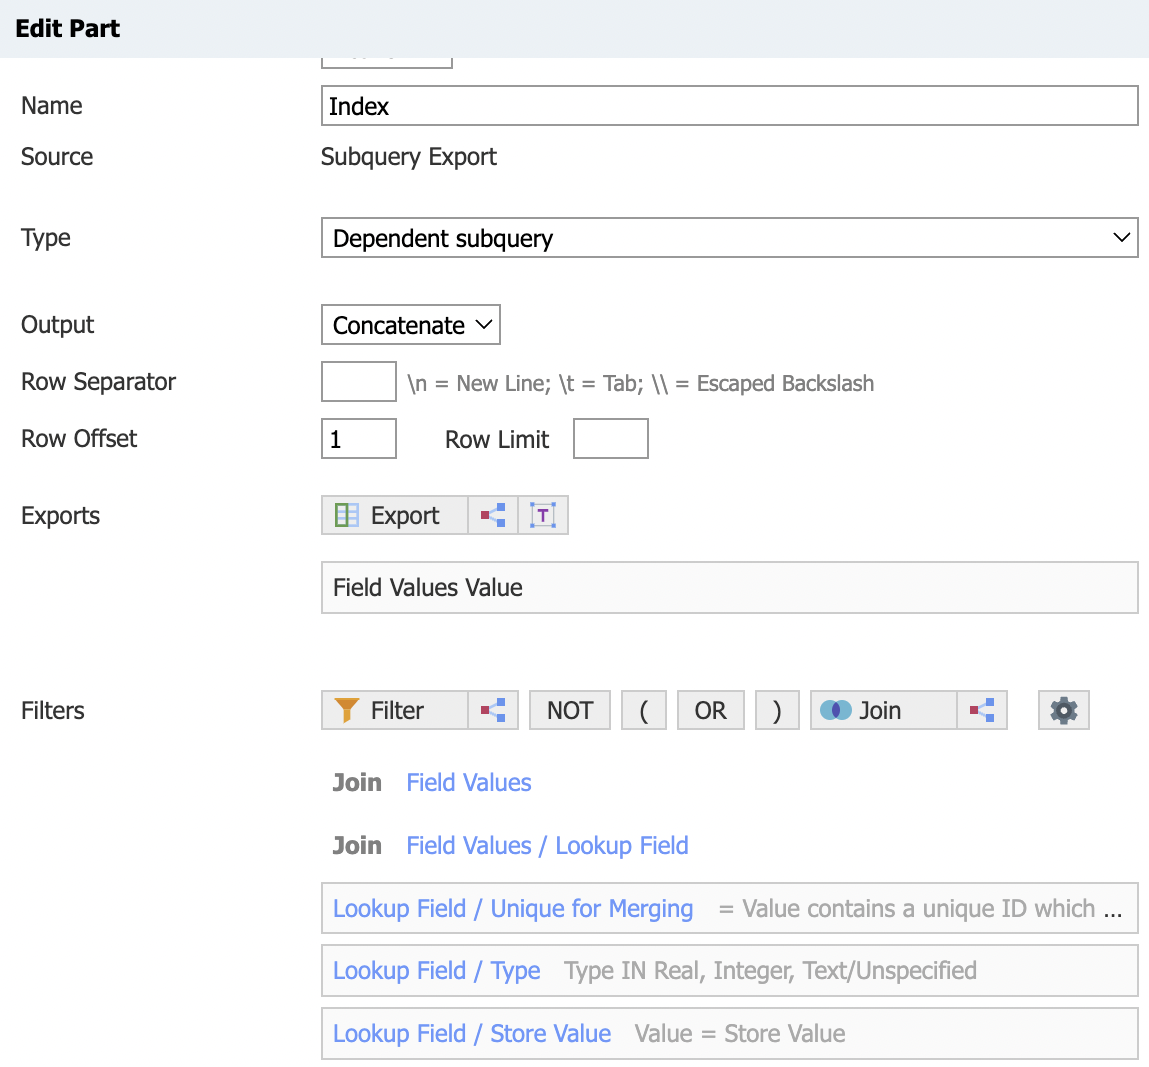
Select Save.
In the Formula section, type
@and select the export from the list (@Index).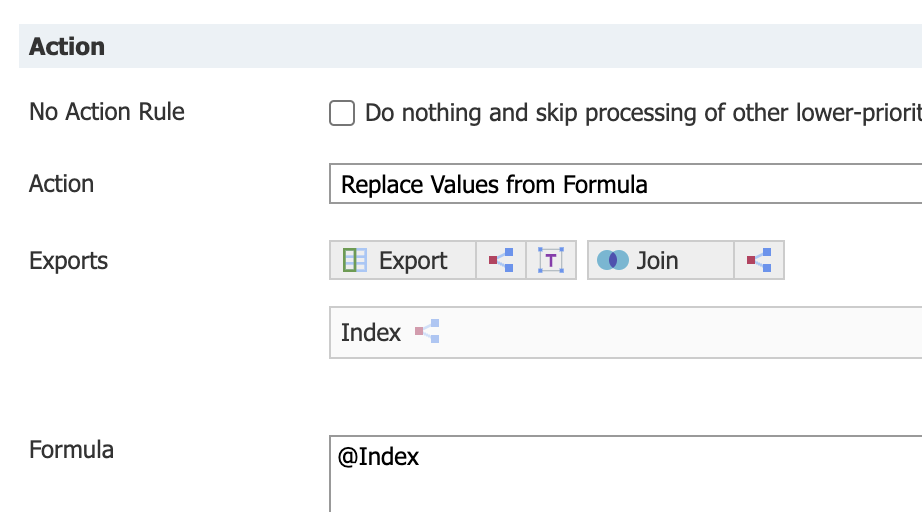
Select Save.
Person Header example
This example builds one complete header rule from start to finish.
In this example, the header shows:
Address information: city and state for addresses in the United States, or city and country for anywhere else.
The record's birthdate, which no longer appears by default once a replacement header applies.
The record's rank 1 school name.
📝 Note
A record's rank 1 school is typically their most recent school. See Database Structure & Determination of Table Ranks for more about how rank works.
Step 1: Create the joins
In the Action section, create a join from Person to Address by Type, Rank. Choose Permanent Address from the Type list, and enter
1for the Rank. This returns the rank 1 permanent address for the person record. See Database Structure & Determination of Table Ranks for more information on ranking. Select Save to continue.Create another join from Person to School by Level of Study, Rank. Choose the desired level of study, and enter
1for the Rank. Select Save to continue.
💡 Tip
To show a record’s rank 1 school of any level of study, join to School by Rank Overall instead.
Step 2: Create the header export
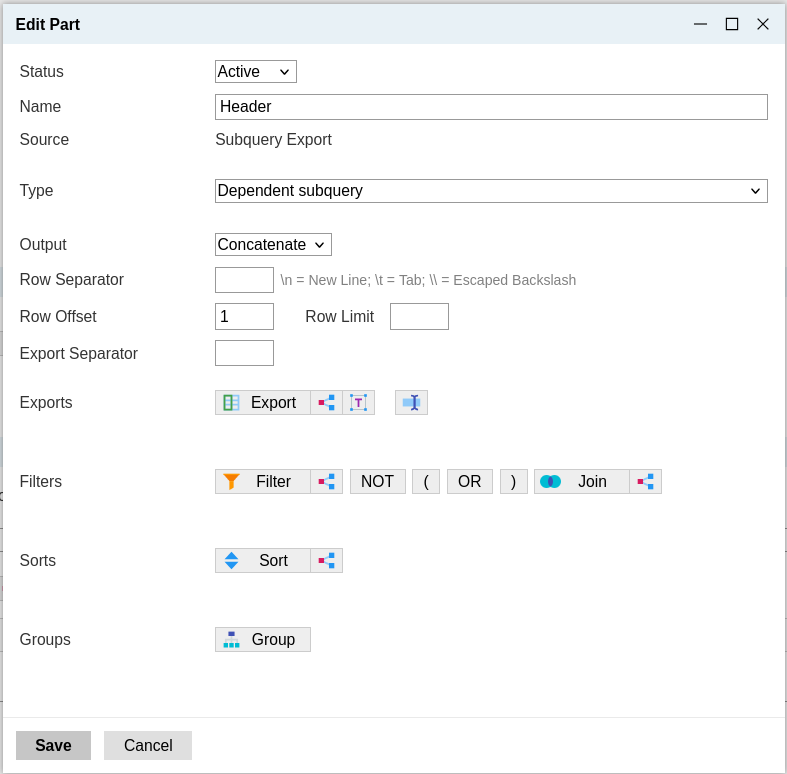
In the Action section, add a subquery export and set the following:
Name: Enter a name, such as Header.
Output: Concatenate.
Leave the remaining settings as their defaults. Don’t close the pop-up yet.
Step 3: Create the birthdate and location export
Next, add a nested subquery export that returns the record’s birthdate and location on the same line.
Select Subquery Export to add a nested subquery export to your header export. Set the following:
Name: Enter a name, such as birthdate and location.
Output: Concatenate.
Export Separator: Enter a semicolon followed by a space (
;). Don’t close the pop-up yet.
Add the Birthdate export from the Person base to the nested subquery export.
Edit the export (named Person Birthdate by default):
Format Mask: Enter
MM-dd-yyyy. The Format Mask controls how the birthdate appears (for example, January 2, 1999 displays as01-02-1999).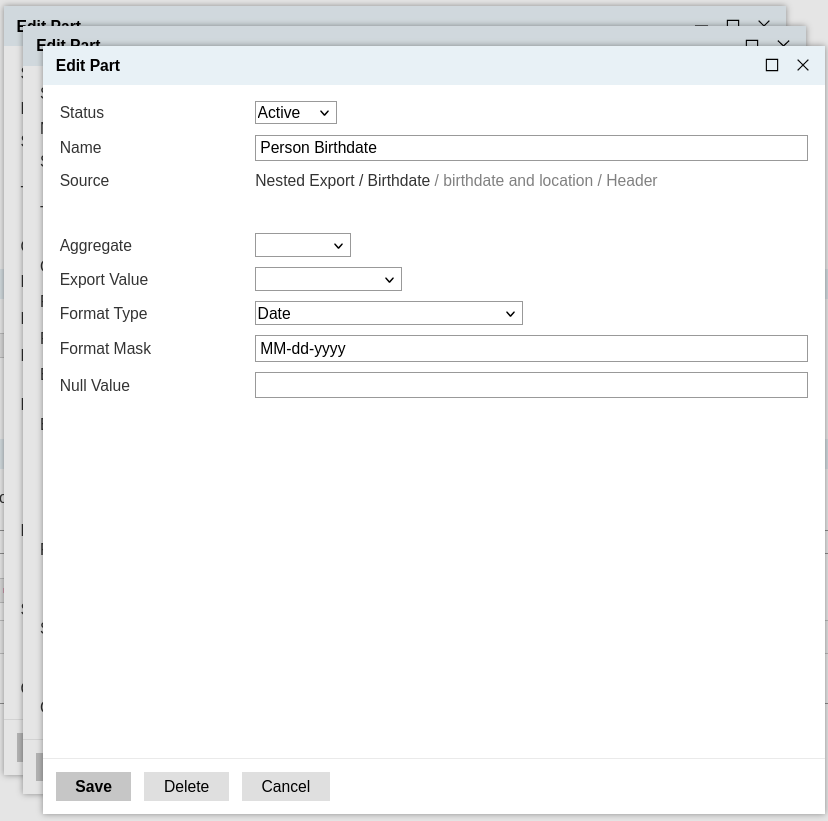
Select Save to close the dialog box.
In the birthdate and location subquery export window, select Subquery Export to add another nested subquery export. Set the following:
Name: location
Output: Concatenate
Export Separator: Enter a comma followed by a space (
,).
Add the City export from the Address by Type, Rank join to your nested location subquery export.
In the location subquery export window, add another nested subquery export for the region. Set the following:
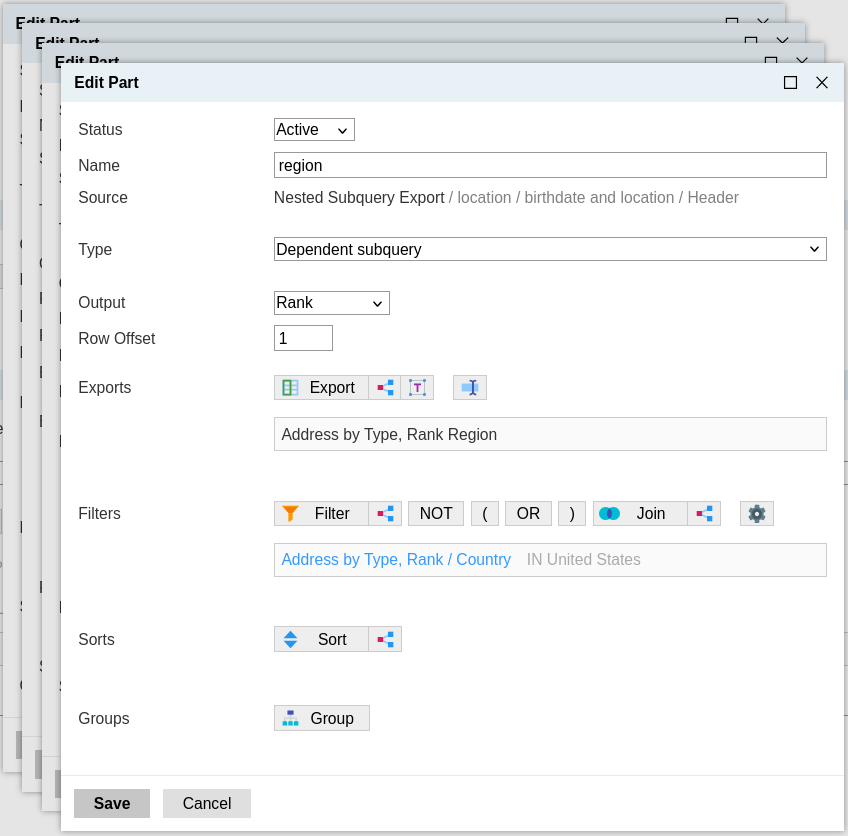
Name: region
Output: Rank
Row Offset: 1
In the region subquery export window:
Add the Region export from the Address by Type, Rank join.
Add the Country filter from the Address by Type, Rank join. Filter for Country IN United States. Slate will return a region value only when the address is in the United States.
Save the region subquery export.
In the location subquery export window, select Subquery Export to add another nested subquery export for the country. Set the following:
Name: country
Output: Rank
Row Offset: 1
In the country subquery export window:
Add the Country export from the Address by Type, Rank join.
Add the Country filter from the Address by Type, Rank join. Filter for Country NOT IN United States. Slate will return a country value only when the address isn't in the United States.
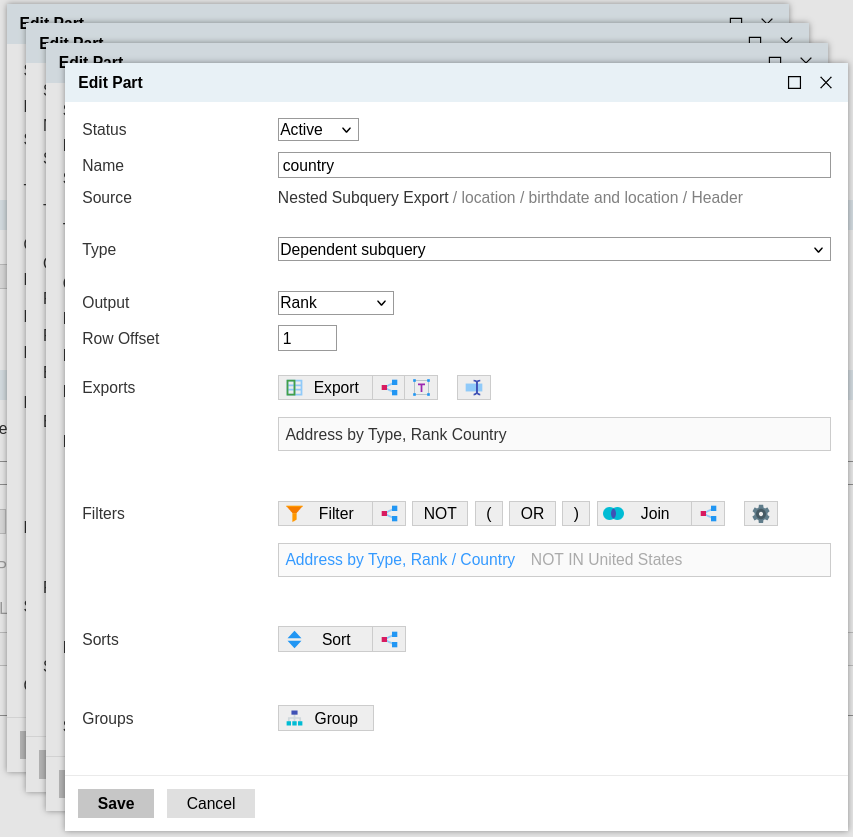
Save the country subquery export.
Confirm the location subquery export is set correctly:
Output: Concatenate
Export Separator:
,Export: city
Subquery export: region
Subquery export: country
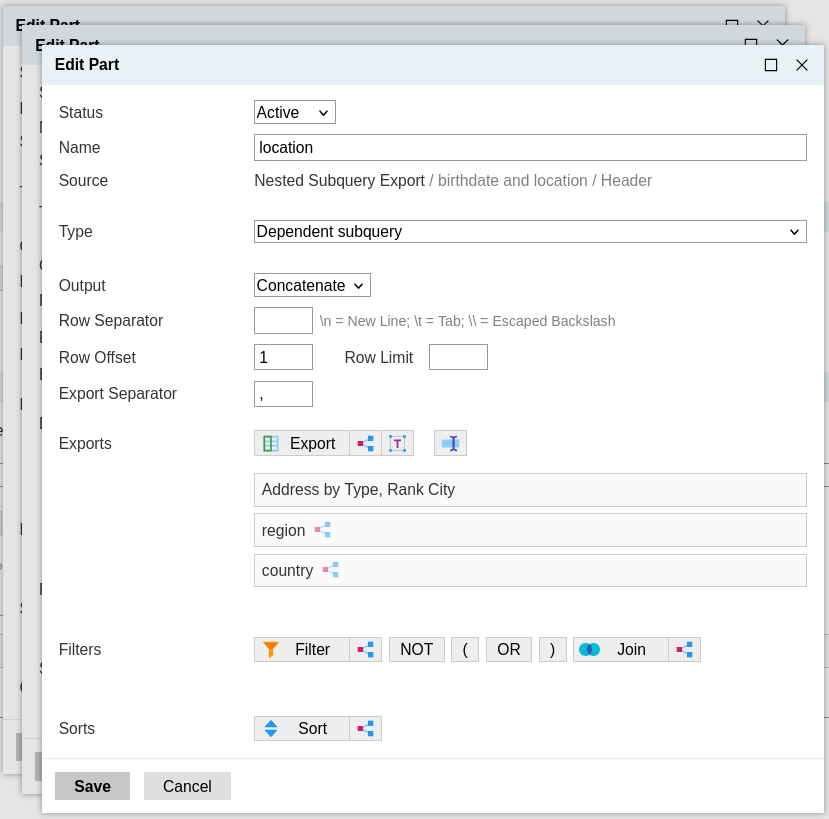
If correct, save the location nested subquery export.
Save the birthdate and location subquery export.
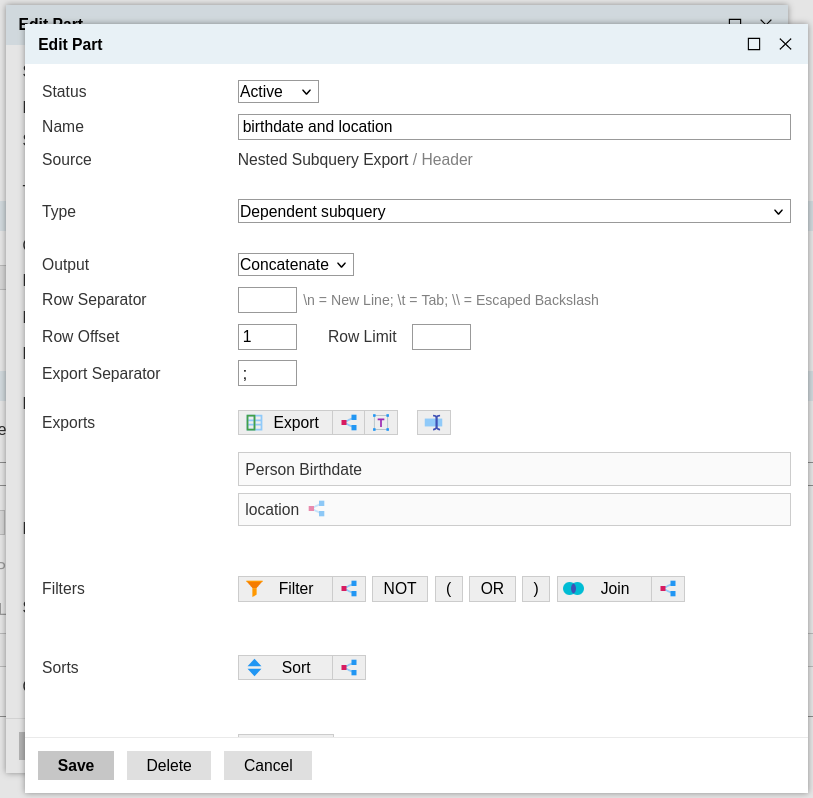
Step 4: Create the school export
Next, add another nested subquery export that returns the person’s school on a new line.
Back in the header subquery export window, add a new subquery export. Set the Name to
schooland select the Output setting Concatenate. Leave the remaining settings as their defaults.Under Exports, add a Literal
 named New Line with the value
\n. This creates a new line before the school name.
Add the Name export from the School by Level of Study, Rank join.
Confirm the school subquery export is set correctly:
Output: Concatenate
Literal: New Line
Export: School by Level of Study, Rank Name
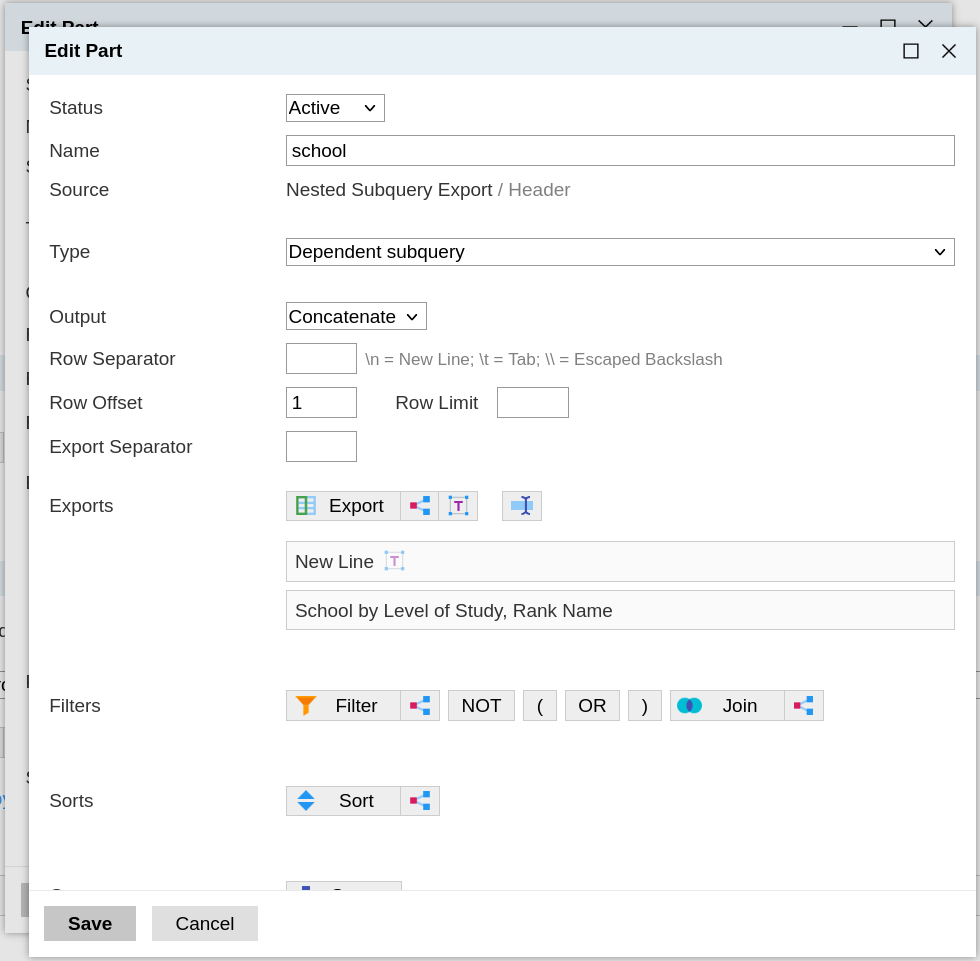
Save the school subquery export.
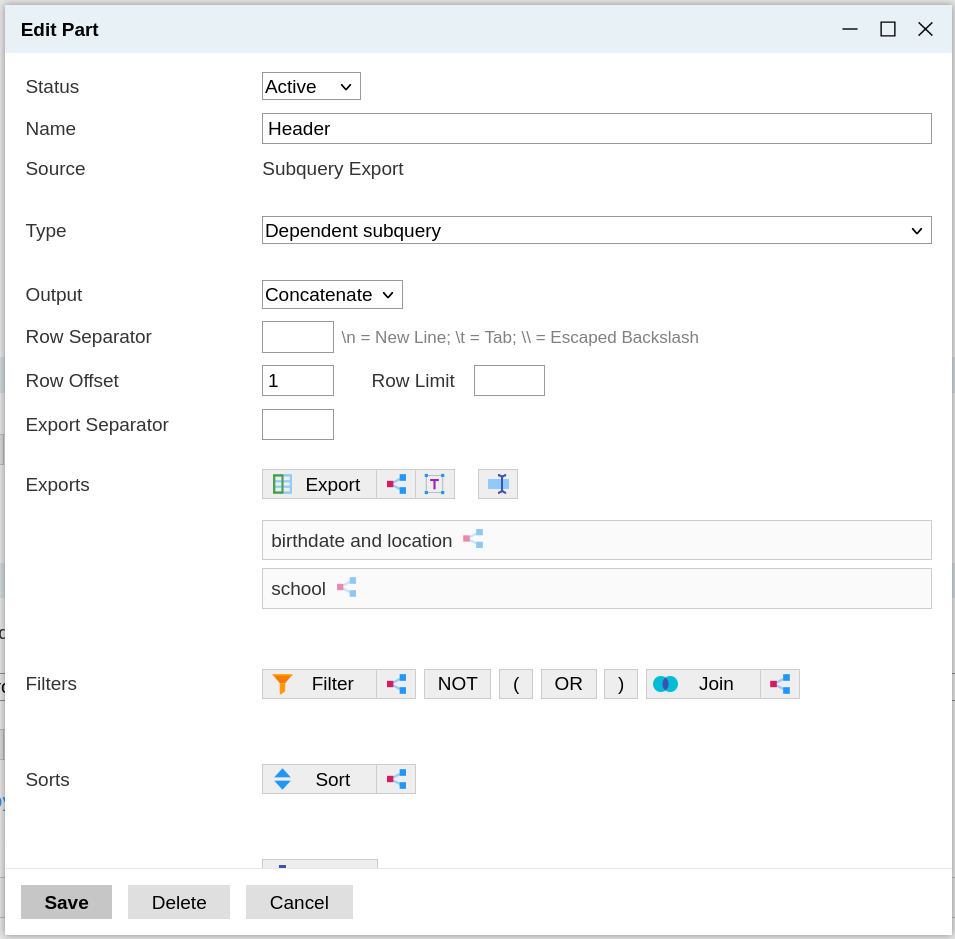
Step 5: Confirm the header export is set correctly
Before saving the header subquery export, confirm it's set correctly:
Output: Concatenate
Subquery Export: birthdate and location
Subquery Export: school
If correct, Save the header subquery export.
Step 6: Set the formula
In the Formula text box, enter
@Header(or replace ‘Header’ with the name of your subquery export).Save.
This formula sets the record's header to the value built by the header subquery export. Because the subquery export accounts for missing values, a record that doesn't have one of the values still displays the others.